Shooting Tips
Mastering Your Target Knobs
A couple of years ago, I took along a neighbor for his first stint at long-range shooting. After lazing a tin can at 233 yards, I set my elevation knob, fired, and sent it flying. He was astonished that my very first shot hit so tiny a target nearly 2-1/2 football fields away. More recently, an apprentice rifleman thought it an amazing achievement when I knocked down an 8-inch reactive target, this time at a lazed 691 yards.
Actually, with practice you can do the same thing -- perhaps even better -- if you master your target knobs, such as those found on Millett's LRS, TRS and Target/Varmint Scopes. Here's how to do it.
Understanding Minutes of Angle
The first step is learning about Minutes of Angle, or MOA, the basic unit of measurement on target knobs. You probably didn't realize it, but you've already been using MOA increments with your ordinary hunting scope -- when zeroing it you removed the cap on the elevation and found a notice that one click equaled "1/4 Inch at 100 Yards." Target knobs use the same system, the difference being your ability to see on an external knob exactly how much elevation (or windage) you are using.
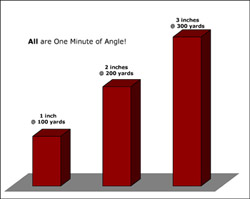
As its name says, the MOA is an angle, a very thin wedge that expands at a steady rate so that at 100 yards it measures almost exactly 1 inch and continues to expand with distance -- at 200 yards it's 2 inches wide, then 3 inches at 300 yards, 6 inches at 600 yards, 10 inches at 1000 yards, and so on.
Since we track exterior ballistics in yards, and measure groups and make sight changes in inches, this MOA provides a handy, precise measurement for rifle shooting. The knob's increments (amount of movement per click) are fractions of an MOA, the most common being _ MOA per click. All this means is that it takes four clicks to equal one MOA. If you're looking at a target 100 yards away, four clicks will move the bullet's point-of-impact one inch. The principle is the same for those scopes having 1/8 MOA per click -- it takes eight clicks to equal one MOA, and when your target is 100 yards away, those eight clicks will move the point-of-impact one inch.
Now here's an important concept -- because it is an ever-widening angle, the size of an MOA grows with distance. One click on a _ MOA knob at 100 yards moves the point-of-impact _" but that same one click at 400 yards will move it four times as much, or one full inch. It was four times as far, so one click moved the point-of-impact four times as much -- get it? Remember, the MOA is an angle and it widens at the same rate as the distance increases. Consider this data, below:
MOA at Various Distances
| 100 Yards | 200 Yards | 300 Yards | 400 Yards | 500 Yards | 600 Yards | |
|---|---|---|---|---|---|---|
| 1 MOA | 1" | 2" | 3" | 4" | 5" | 6" |
| _ MOA | _" | _" (2/4") | _" | 1" (4/4") | 1-1/4" (5/4") | 1-1/2" (6/4") |
| 1/8 MOA | 1/8" | 1/4" (2/8") | 3/8" | _" (4/8") | 5/8" | _" (6/8") |
A simple way of keeping this straight in your head is to think of how your _ or 1/8 MOA clicks grow with distance, which I've put in parenthesis. If your scope has 1/8 MOA clicks, it equals 1/8" per click at 100 yards, 2/8" at 200, 3/8" at 300, 4/8" at 400, 5/8" at 500, 6/8" at 600 and so forth. That 4/8" at 400 yards is more properly expressed as _" but thinking of it in eighths is easier to remember. This way of remembering increments works with _ MOA clicks, too, as shown in the parenthesis, above.
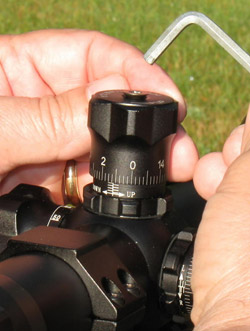 After achieving a precise zero, loosen the Millett LRS elevation knob's hex screw (on top), then carefully rotate it to align with the "0" and tighten it back down. Some scope knobs do this with multiple hex screws on the side of the knob.
Zeroing a Target Knob Scope
Zeroing with target knobs is simple and not much different than zeroing an ordinary hunting scope. Shoot in the morning, before wind becomes a factor, or fire your shots during calm spells between gusts. Fire from a solid support, preferably sandbags.
First, fine-tune the windage, firing at least 3 rounds per group, and rotate the knob right or left until you're satisfied. Then, fine-tune the elevation, also firing 3- or even 5-round groups until zeroed.
Now here's where it gets different: loosen the knobs which, depending on the model or manufacturer, involve a single hex screw on top (as in the LRS scope in the accompanying picture) or two or three smaller hex screws on the side of the knobs, such as found on the TRS scopes. VERY CAREFULLY rotate the loose, disengaged knob -- so you don't change the setting -- then align the "0" with the center line (see the accompanying photograph) and tighten it down.
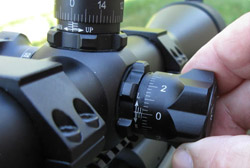
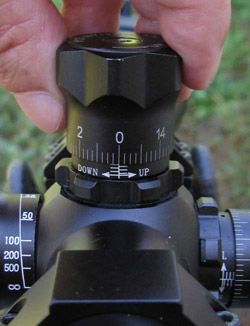 This is how a properly aligned elevation knob looks -- the "0" is perfectly in line with the vertical centerline below. After this, you crank "up" elevation to hit targets beyond the zero distance, or rotate "down" to hit closer ones.
By aligning that "0" with the center line, you have literally "zeroed" your scope. It now has zero elevation so it's dead-on at the distance at which you zeroed. From this setting you will either crank "up" the elevation to engage more distant targets, or rotate "down" the elevation to hit targets at closer than the zero distance.
Here's the next important point: This zero is only valid when your elevation knob is set on this rotation. Depending on the scope, it may offer five or more rotations to yield its full range of elevation, so it's essential that you know which rotation you're on when you zero. (In most scopes, I find that I'm on the second or third rotation for a 100-yard zero.) How do you know which rotation you're on? Many target knob-equipped scopes have a scale below the knob that tells you the rotation; on the Millett LRS (see photo), the hash marks on the scale's left show full rotations, while the right hash marks signify half-rotations. Looking at the photo tells me this zero is on the third rotation.
Another way to note rotation is to count how many complete turns it takes from zero to 'bottom out' of elevation. You then know, for example, that your zero is three rotations "up" from the bottom.
No matter how I verify my zero rotation, I carefully check it each time my rifle comes out of the case, and when I put it back in the case. I also maintain a book on each of my rifles and note which rotation has my zero.
Precisely Aiming with Target Knobs
Of the four ways a rifleman can compensate for distance when firing long-range, by far target knobs offer the most exact way of aiming. The least accurate way of compensating is to "hold over" or aim high. Let's say you have a target 500 yards away, and the trajectory of your round requires that you aim 52 inches over the target. You "guestimate" what 52 inches should be at 500 yards, hold that high and fire, hoping for the best. It's the fastest way to compensate for distance, but it's the least precise.
Say, however, that your scope has a Bullet Drop Compensator, (BDC), an elevation dial that allows setting the elevation for that 500-yard distance. The problem is, BDCs rely upon an "average of averages" for their elevation settings, using standardized ballistic data. If your rifle does not have a 24-inch barrel, your crosshair is not 1-1/2 inches above the bore, it's not 59 degrees F., and you're not at sea level, the BDC is going to be somewhat off. This degrades further if you're not firing the exact load that generated the BDC settings. Therefore, despite lazing the distance and dialing your BDC for 500 yards, the bullet may well impact five inches low or five inches high -- you cannot be certain because it was designed for an average of all rifles and all ammunition of your caliber. Some customized BDCs are available for specific loads, but even these have limitations -- most use increments of one full MOA per click, which is much coarser than target knobs. However, the BDC is usually more accurate than mere holdover.
Then there's a ballistic reticle or mil dot reticle, employing what I call, "aimed holdover." These are quick to use but you have to know which lines or dots or spaces are the holdover aiming points. You're not really using the center crosshair. If you do the math, you'll also find that a target knob's _ or 1/8 MOA increments generate an aiming point that's closer to true than these reticles' spaced lines and dots. Still, though, these are fast because the shooter's eye never leaves his scope.
And now, true precision.
Go back in this article and consider what those _ and 1/8 MOA increments represent at various distances. At 500 yards, one click on a _ MOA knob equals 1-1/4 inches, which means you can adjust and aim that precisely -- and a 1/8 MOA click is finer yet, offering 5/8" elevation changes at 500 yards. To shoot with phenomenal precision, just test-fire your rifle at assorted distances, carefully record the precise target knob settings and then you're ready to fire just as precisely in the field. (Firing the same load, of course) As a minimum, I test-fire and record my settings at 25-yard intervals from my 100-yard zero out to at least 500 yards with most rifles, and to 1000 yards (or more) with my heavy guns.
Reading Your Target Knobs
Don't be intimidated by all the hash marks and numerals on your target knob. It's all very logical and not all that complicated.
An accompanying photo displays a setting on my LRS scope, which has _ MOA per click. You can clearly see three vertical hash marks between each wider line -- the wider lines represent full MOAs -- so you know this scope has _ MOA clicks. These vertical hash marks represent _ MOA, _ MOA and _ MOA. (If this was a 1/8 MOA knob, there would be seven little hashmarks between the wider, full-MOA lines.)
On the Millett LRS, only the even MOA numerals (2, 4, 6, 8, 10, 12 and 14) are depicted so that the knob doesn't become too clogged with numbers. Wide lines show where the odd-numbered MOAs (1, 3, 5, 7, 9, 11, 13, 15) are found between the even-numbered ones. Although the highest numeral is "15" there are actually 16 MOAs per rotation, because the last (highest) MOA is at the same spot as "0" -- get it? (Take another look if you don't.) By the time you have clicked "UP" 16 MOAs, you are at the "0" of the next rotation.
To read (and record) your target knob settings is simple. First, look at my photo example and note that the horizontal lines below the knob show that it's set on Rotation Three. (It's the third line on the left column of lines, just to the right of where it says, "Down.") Remember, the left column of lines shows full rotations; disregard the right lines which show half-rotations.
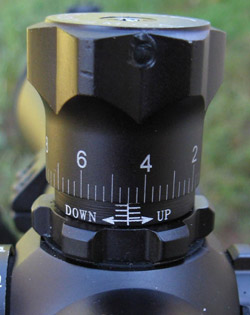 To read this knob setting: Note that it's on Rotation Three (third horizontal line on the left), and the knob has been rotated "UP" from the zero, so it's at 4 MOA plus two clicks, also expressed as 4-1/2 MOA.
Now, note the "4" which means the knob has been turned Four MOAs above Rotation Three, and the exact setting is two clicks further. Putting it together, I would record this as, "(Rotation Three) UP 4 MOA plus 2 clicks." Some purists would say more properly this should be called, "4-1/2 Minutes," but I find it clearer to record and apply sight changes by minutes and clicks. To take it one step further, add the yardage at which this setting is dead-on, so that your final entry is, "(Rotation Three), UP 4 MOA plus 2 clicks = 250 Yards."
In the process of refining these knob settings, you'll be firing at assorted distances and making very precise sight changes. Here's an easy way to calculate the changes, thanks to a formula used by an old friend, Jim "K-Bar" Kauber, a retired Navy SEAL Master Chief and fellow sniper instructor.
Let's say you fire a shot at a target 300 yards away, and it impacts 15 inches low.
Therefore, you raise your elevation by 5 MOAs, fire another shot to confirm it's perfectly on-target, then jot down the target knob setting. Think about this process -- in essence, you are recording the exact elevation settings for a variety of distances, clicking up or down to be within _ or 1/8 MOA of being absolutely dead-on. This can only yield phenomenal accuracy.
 The LRS scope's windage knob offers _ MOA clicks, just like the elevation. Proper windage zero is important, but Maj. Plaster prefers to compensate for wind using the scope's mil-dot reticle.
I've said very little about the windage knob. Indeed, you can employ your windage knob as much as you do the elevation knob, but I most often I set elevation for my target's distance, then hold off right or left for wind compensation, using the aiming points on my mil-dot reticle. As it is, target knobs are the slowest way to adjust for a target's distance, and having to adjust both knobs only takes that much longer. My major exception is when I'm confronting multiple targets at the same distance in a consistent wind, such as shooting prairie dogs. Then it's definitely worth taking the time to adjust the windage knob.
In my next column, I'll detail how to develop and record your target knob's elevation settings (or, "dope" as old time shooters call it), and put it all on a 3 x 5 Ballistic Data Card for quick reference. Pretty soon we'll have you hitting that tin can at 233 yards with your very first shot.